Windows Installation
Windows Installers
Windows installers are available with the different releases. The release includes zip archives with static libraries containing both the Debug version and Release version for several versions of Visual Studio. There is also an installer and zip file for getting the HELICS apps and shared library along with pre-built Python 3.6 and Java 1.8 interfaces. There is also an archive with just the C shared library and headers, intended for use with 3rd party interfaces.
Build Requirements
Microsoft Visual C++ 2015 or newer (MS Build Tools also works)
CMake 3.4 or newer(CMake should be newer than the Visual Studio and Boost version you are using)
git
Boost 1.58 or newer
MS-MPI v8 or newer (if MPI support is needed)
Setup for Visual Studio
Note: Keep in mind that your CMake version should be newer than the boost version and your visual studio version. If you have an older CMake, you may want an older boost version. Alternatively, you can choose to upgrade your version of CMake.
To set up your environment:
Install Microsoft Visual C++ 2015 or newer (2017 or later is recommended)MSVC
Install Boost Windows downloads 1.61 or later recommended (core library should build with 1.58, but tests will not). For CMake to detect it automatically either extract Boost to the root of your drive, or set the
BOOST_INSTALL_PATHenvironment variable to the install location. The CMake will only automatically find boost 1.58 or newer. Building with Visual Studio 2017 will require boost 1.65.1 or newer and CMake 3.9 or newer. Use 14.0 versions for Visual Studio 2015, 14.1 files for Visual studio 2017. Visual studio 2019 will require CMake 3.14 or later. Boost 1.70 with CMake 3.14+ is the current recommended configuration.As an (experimental) alternative for installing Boost (and ZeroMQ), you can use vcpkg – it is slower because it builds all dependencies but handles getting the right install paths to dependencies set correctly. To use it, follow the vcpkg getting started directions to install vcpkg and then run
cmakeusing-DCMAKE_TOOLCHAIN_FILE=[path to vcpkg]/scripts/buildsystems/vcpkg.cmake, or by setting the environment variableVCPKG_ROOT=[path to vcpkg]prior to runningcmake.Optional Only if you need a global Install of ZeroMQ ZeroMQ. We highly recommend skipping this step and running CMake with the
HELICS_ZMQ_SUBPROJECT=ONoption enabled(which is default on windows) to automatically set up a project-only copy of ZeroMQ. The ZeroMQ Windows installer is very outdated and will not work with new versions of Visual Studio. The CMake generator from ZeroMQ on windows is also functional and can be used to store ZMQ in another location that will need to be specified for HELICS.Optional Install MS-MPI if you need MPI support.
Optional Install SWIG if you wish to generate the interface libraries, appropriate build files are included in the repository so it shouldn’t be necessary to regenerate unless the libraries are modified. If you want to generate the MATLAB interface a modified version of swig is necessary see MATLAB Swig. For Matlab, Python 3, and Java swig is not necessary. For Octave, Python2, and C# swig install is necessary. The simplest way to install swig is to use chocolatey and use
choco install swig
from windows power shell.
Open a Visual Studio Command Prompt, and go to your working directory.
Make sure CMake and git are available in the Command Prompt. If they aren’t, add them to the system PATH variable.
Getting and building from source:
Set up your environment.
Open a command prompt. Use git clone to check out a copy of HELICS.
git clone https://github.com/GMLC-TDC/HELICS.git
Go to the checked out HELICS project folder (the default folder name is HELICS). Create a build folder and open the build folder. Alternatively, cmake-gui can be used.
    cd HELICS
    mkdir build
    cd build
Run CMake. It should automatically detect where MPI is installed if the system path variables are set up correctly, otherwise you will have to set the CMake path manually.
ZMQ_LOCAL_BUILDis set to ON so ZeroMQ will automatically be built unless the option is changed.cmake ..If you need CMake to use a generator other than the default (ex: selecting between a 32-bit or 64-bit project), the -G option can be used to specify one of the generators listed by CMake –help. For Visual Studio 2017, the generator name would be
Visual Studio 15 2017 [arch], where [arch] is optional and can be either Win64 for a 64-bit project, or left out to generate a 32-bit project. To avoid problems when building later, this should match the version of the Boost libraries you are using.If you installed boost into the root of the C or D drives with the default location (or the BOOST_INSTALL_PATH environment variable has been set), CMake should automatically detect their location. Otherwise the location will need to be manually given to CMake. NOTE: CMake 3.14 and later separate the architecture into a separate field for the generator
Open the Visual Studio solution generated by CMake. Under the Build menu, select Build the Solution. Alternatively, in the MSBuild command prompt, run the command msbuild HELICS.sln from the build folder to compile the entire solution. HELICS.sln can be replaced with the name of one of the projects to build only that part of HELICS.
Testing
A quick test is to double check the versions of the HELICS player and recorder (located in the ‘build/src/helics/apps/player/Debug’ folder):
> cd C:/Path/To/build/src/helics/apps/Debug

> helics_player.exe --version
x.x.x 20XX-XX-XX

> helics_recorder.exe --version
x.x.x 20XX-XX-XX
there may be additional build information if a non tagged version is built.
Building HELICS with python support
Setting -DBUILD_PYTHON_INTERFACE=ON will generate a project to build the python interface, if python is installed to a system
path then the appropriate libraries and flags will be automatically found. If SWIG is available and you wish to regenerate the interface, ENABLE_SWIG can be set to ON to use swig
to generate the interface files. SWIG_EXECUTABLE can be set to the path of the swig.exe if
We highly recommend using Anaconda3/Miniconda3 for the Python distribution.
Additionally, you will need to ensure that the Python distribution used is built using the same compiler architecture (x86/x64) as the one you are using to build HELICS, as well as the one that was used to build Boost (as mentioned above).
ZeroMQ will be built using the CMake build process.
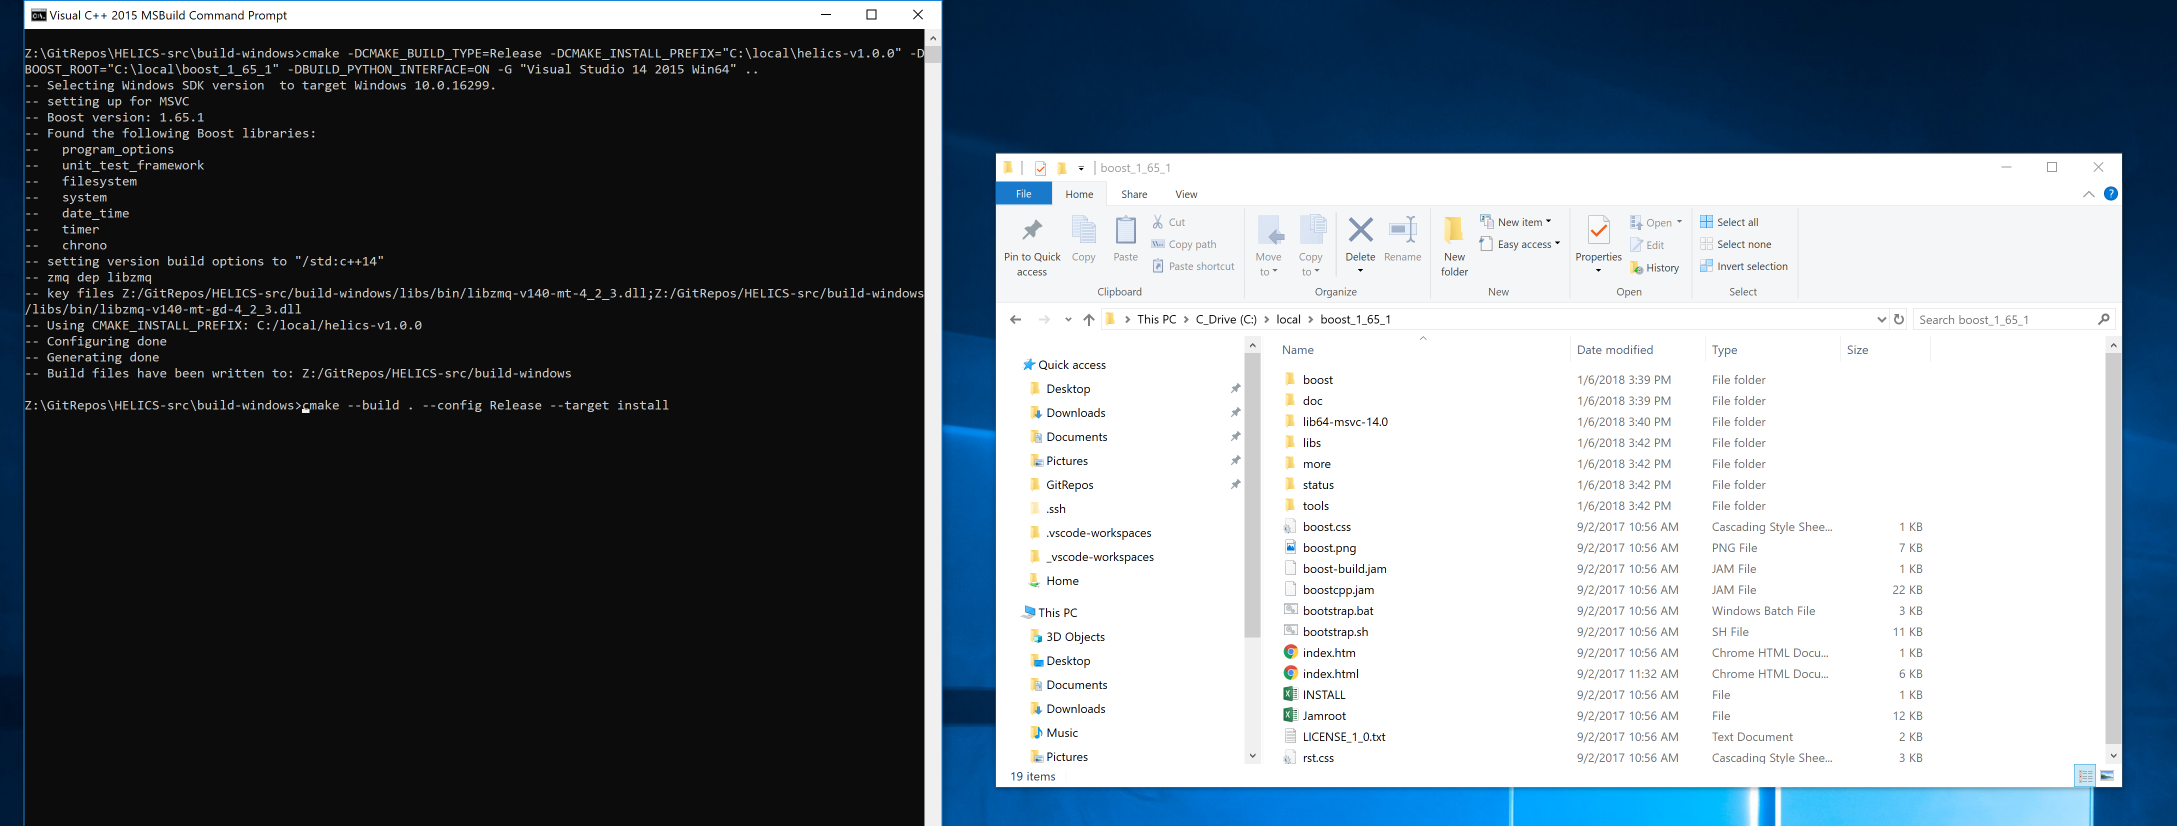
CMake -DCMake_BUILD_TYPE=Release -DCMake_INSTALL_PREFIX="C:\local\helics-X.X.X" -DBUILD_PYTHON_INTERFACE=ON -G "Visual Studio 14 2015 Win64" ..
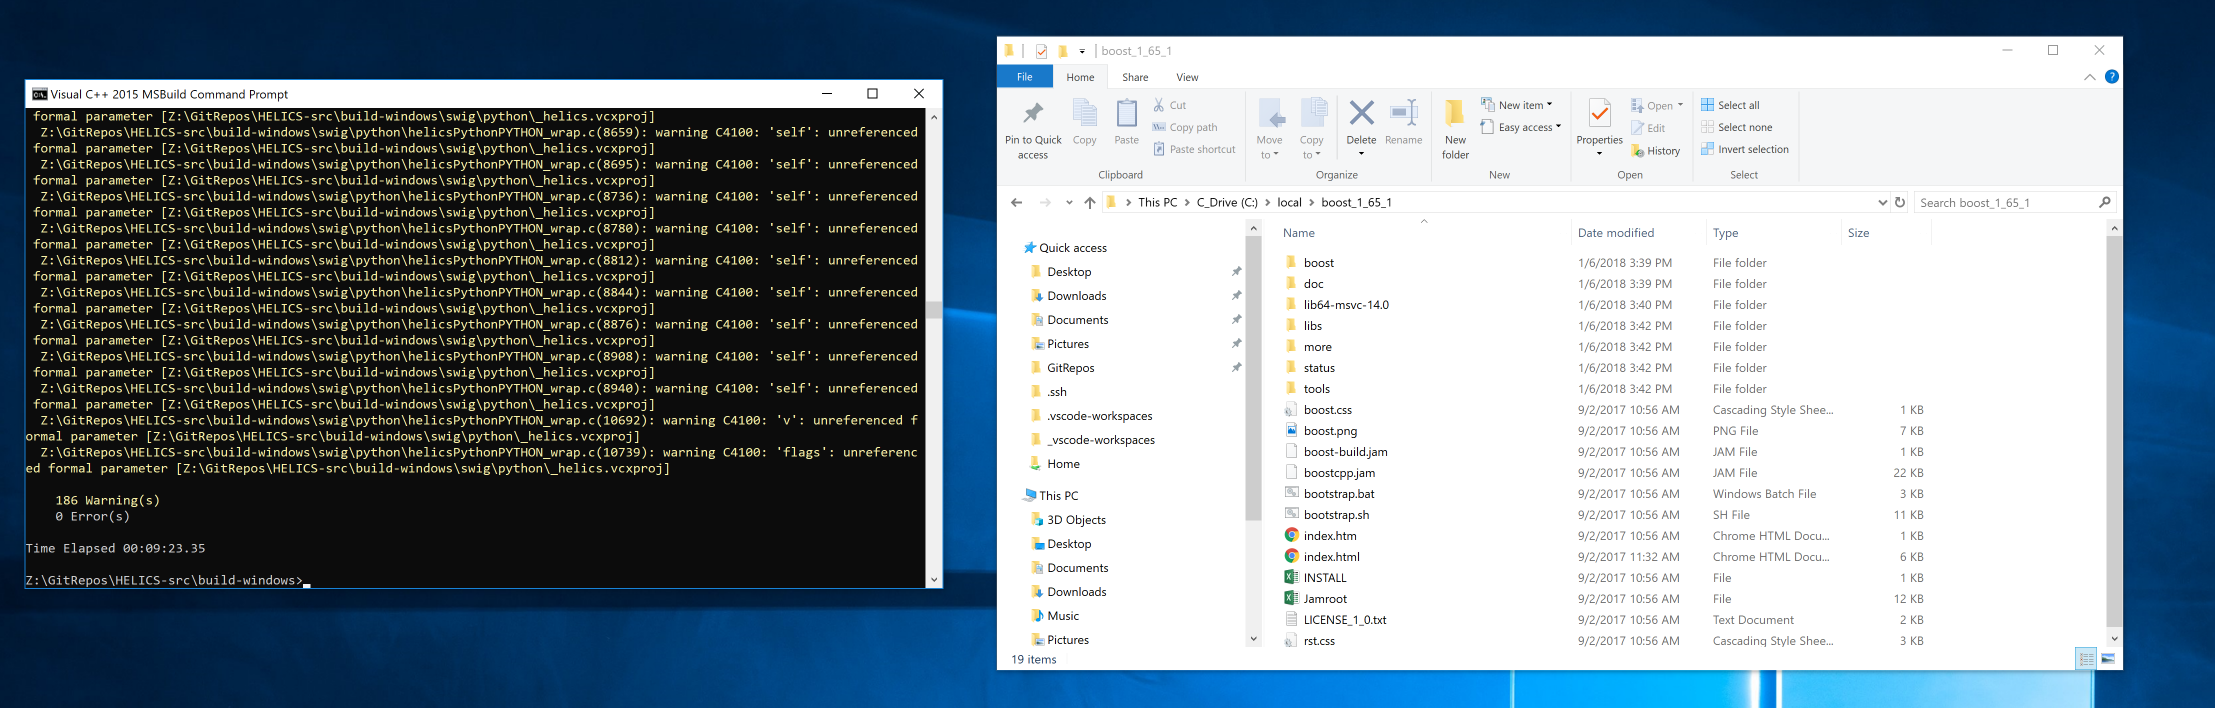
CMake --build . --config Release --target install
otherwise they can be set through CMake flags
CMake -DCMake_BUILD_TYPE=Release -DCMake_INSTALL_PREFIX="C:\local\helics-X.X.X"  -DBUILD_PYTHON_INTERFACE=ON -G "Visual Studio 14 2015 Win64" ..
CMake --build . --config Release --target install
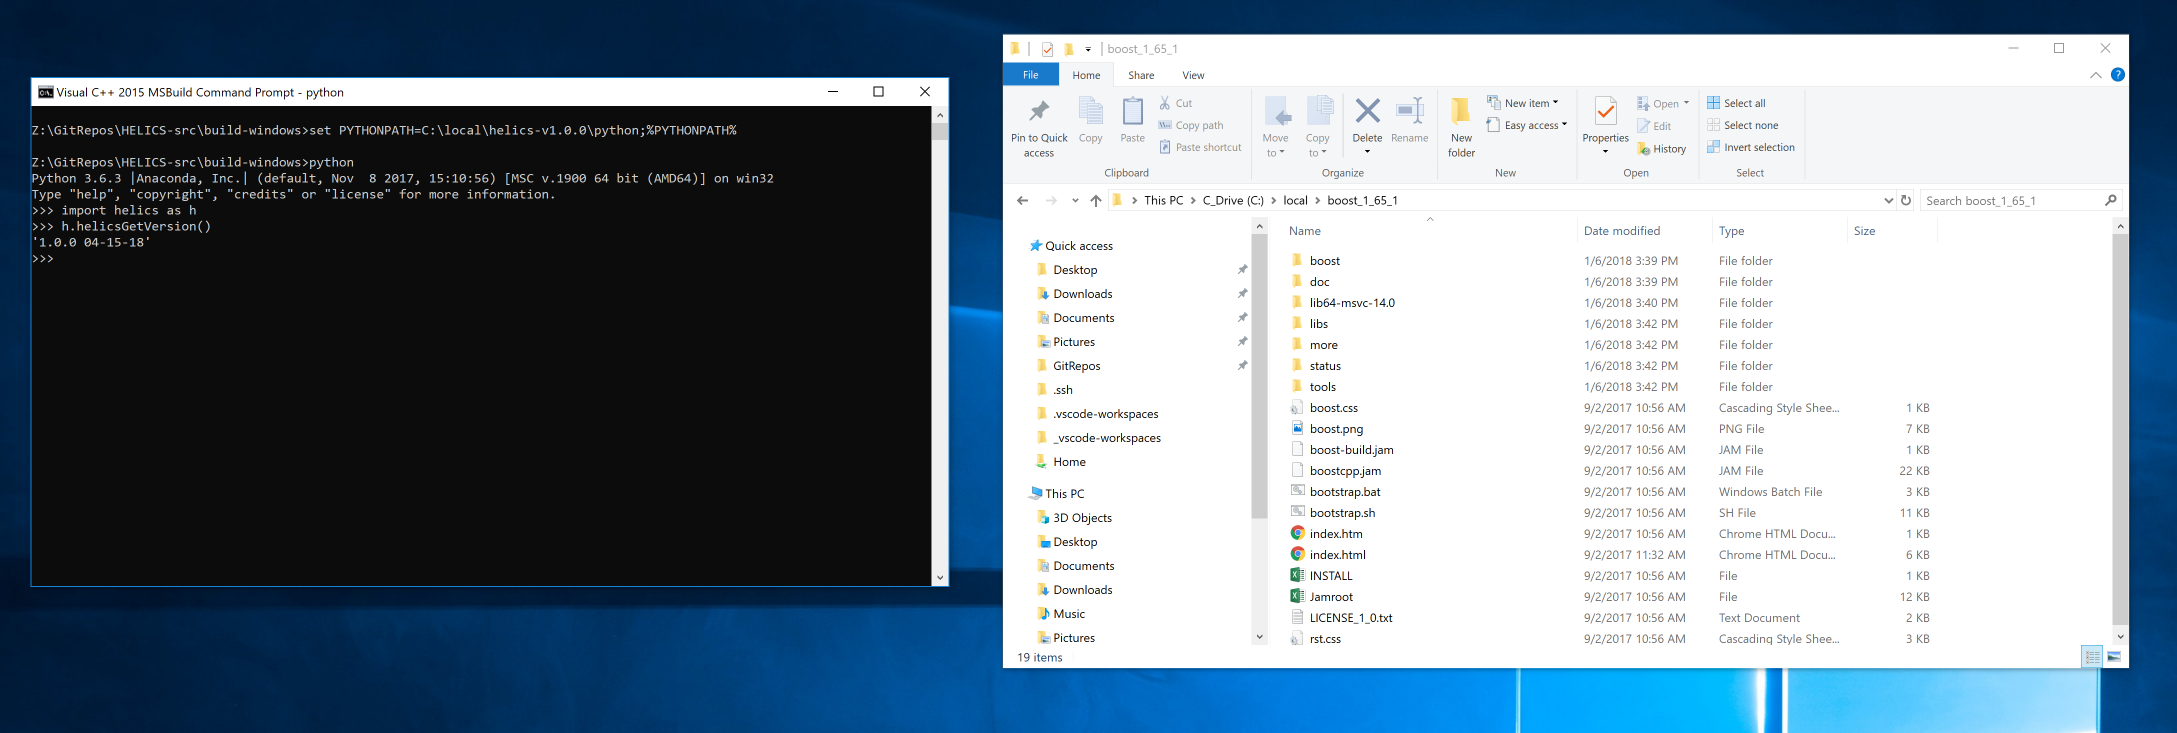
Add the following to the Windows PYTHONPATH environment variable or run the following in the command line.
set PYTHONPATH=C:\local\helics-X.X.X\python;%PYTHONPATH%
If you open a interactive Python session and import HELICS, you should be able to get the version of helics and an output that is similar to the following.
$ ipython
Python 3.6.4 |Anaconda, Inc.| (default, Jan 16 2018, 12:04:33)
Type 'copyright', 'credits' or 'license' for more information
IPython 6.2.1 -- An enhanced Interactive Python. Type '?' for help.

In [1]: import helics

In [2]: helics.helicsGetVersion()
Out[2]: 'x.x.x (20XX-XX-XX)'
MSYS2
MSYS2 provides a Linux like terminal environment on your Windows system. MSYS2 can be installed from here. Once MSYS2 has been installed start up msys2.exe. Follow first time updates as described on the MSYS2 website.
Using pacman package manager
HELICS is available on the Mingw-32 and Mingw-64 environments through the MSYS2 repositories. From the MINGW64 shell
$ pacman -Sy mingw64/mingw-w64-x86_64-helics
:: Synchronizing package databases...
 mingw32               453.3 KiB  2.86 MiB/s 00:00 [#####################] 100%
 mingw32.sig           119.0   B  0.00   B/s 00:00 [#####################] 100%
 mingw64               456.0 KiB  2.77 MiB/s 00:00 [#####################] 100%
 mingw64.sig           119.0   B  0.00   B/s 00:00 [#####################] 100%
 msys                  185.9 KiB  1804 KiB/s 00:00 [#####################] 100%
 msys.sig              119.0   B  0.00   B/s 00:00 [#####################] 100%
resolving dependencies...
looking for conflicting packages...

Packages (8) mingw-w64-x86_64-gcc-libs-9.2.0-2  mingw-w64-x86_64-gmp-6.2.0-1
             mingw-w64-x86_64-libsodium-1.0.18-1
             mingw-w64-x86_64-libwinpthread-git-8.0.0.5574.33e5a2ac-1
             mingw-w64-x86_64-mpc-1.1.0-1  mingw-w64-x86_64-mpfr-4.0.2-2
             mingw-w64-x86_64-zeromq-4.3.2-1  mingw-w64-x86_64-helics-2.4.0-1

Total Download Size:    9.17 MiB
Total Installed Size:  65.78 MiB

:: Proceed with installation? [Y/n] y
you will be asked to proceed with installation, answering y will install HELICS and the required dependencies.
$ helics_broker --version
2.4.0 (2020-02-16)
The helics apps and libraries are now installed, and can be updated when HELICS gets an update. For the MINGw32 use
$ pacman -Sy mingw32/mingw-w64-i686-helics
if you are installing both the 32 and 64 bit versions or just want a simpler command to type
$ pacboy -Sy helics
:: Synchronizing package databases...
if the python interface is needed on MSYS2 it can be installed through pip but requires some setup first.
$export CMAKE_GENERATOR="MSYS Makefiles"
$pip install helics
This will install the HELICS python extension in the correct location. The pacman package should be installed first
Building HELICS From Source on Windows with MSYS2
After MSYS2 has been successfully updated Some packages need to be installed in order to configure and build HELICS. The following packages need to be installed:
base-devel
mingw-w64-x86_64-toolchain
git
mingw-w64-x86_64-CMake
mingw-w64-x86_64-boost
mingw-w64-x86_64-qt5 (only if you want to be able to run cmake-gui which this guide recommends.)
mingw-w64-x86_64-zeromq
All packages can be installed by typing the following:
$ pacman -Sy base-devel mingw-w64-x86_64-toolchain git mingw-w64-x86_64-CMake mingw-w64-x86_64-boost mingw-w64-x86_64-qt5 mingw-w64-x86_64-zeromq
For base-devel and mingw-w64-x86_64-toolchain you may have to hit enter for installing all packages that are part of the group package. The qt5 package is quite large, if you are only using it once it might be faster to use ccmake which is a text based interface to CMake. After all the packages have been installed has been done /mingw64/bin must be in the PATH environment variable. If it isn’t then it must be added. Please note that this is only necessary if you are compiling in MSYS2 shell. If you are compiling in the MSYS2 MINGW-64bit shell then /mingw64/bin will be automatically added to the PATH environment variable. If not
$ export PATH=$PATH:/mingw64/bin
Download HELICS Source Code
Now that the MSYS2 environment has been setup and all prerequisite packages have been installed the source code can be compiled and installed. The HELICS source code can be cloned from GitHub by performing the following:
$ git clone https://github.com/GMLC-TDC/HELICS.git
git will clone the source code into a folder in the current working directory called HELICS. This path will be referred to by this guide as HELICS_ROOT_DIR.
Compiling HELICS From Source
Change directories to HELICS_ROOT_DIR. Create a directory called helics-build. This can be accomplished by using the mkdir command. cd into this directory. Now type the following:
$ CMake-gui ../
If this fails that is because mingw-w64-x86_64-qt5 was not installed. If you did install it the CMake gui window should pop up. click the Advanced check box next to the search bar. Then click Configure. A window will pop up asking you to specify the generator for this project. Select “MSYS Makefiles” from the dropdown menu. The native compilers can be used and will most likely default to gcc. The compilers can also be specified manually. Select Finish; once the configure process completes finished several variables will show up highlighted in red. Since this is the first time setup the Boost and ZeroMQ library. Below are the following CMake variables that could to be verified.
HELICS_ENABLE_CXX_SHARED_LIBshould be checked if you are using HELICS with GridLAB-D, GridLAB-D dynamically links with the shared c++ library of HELICS, the default is off so you would need to change it
For others the advanced checkbox can be selected to see some other variables
Boost_INCLUDE_DIR C:/msys64/mingw64/include
Boost_LIBRARY_DIR_DEBUG/RELEASE C:/msys64/mingw64/bin
CMake_INSTALL_PREFIX /usr/local or location of your choice
ZeroMQ_INCLUDE_DIR C:/msys64/mingw64/include
ZeroMQ_INSTALL_PATH C:/msys64/mingw64
ZeroMQ_LIBRARY C:/msys64/mingw64/bin/libzmq.dll.a
ZeroMQ_ROOT_DIR C:/msys64/mingw64
Once these CMake variables have been correctly verified click Configure if anything was changed. Once that is complete click Generate then once that is complete the CMake-gui can be closed.
Back in the MSYS2 command window[ make sure you are in the build directory] type:
$ make -j x
where x is the number of threads you can give the make process to speed up the build. Then once that is complete type: make -j will just use the number of cores you have available
$ make install
unless you changed the value of CMake_INSTALL_PREFIX everything the default install location /usr/local/helics_2_1_0. This install path will be referred to as HELICS_INSTALL for the sections related to GridLab-D. If you want to build Gridlab-d on Windows with HELICS see Building with HELICS. Please use branch feature/1179 to build with HELICS 2.1 or later instead of the branch listed.
Compiling with clang
Clang does not work to compile on MSYS2 at this time. It has in the past but there are various issues with the clang standard library on MSYS yet so this will be updated if the situation changes. It is getting closer as of (1/30/2020) Mostly it compiles when linked with Libc++ and libc++abi, but there seems to be some missing functions as of yet, so cannot be used other than for some warning checks.
Building with mingw
HELICS can also be built with the standalone MinGW
We assume you have MinGW installed or know how to install it.
Boost; you can use the Windows installer for Boost installed in the default location
Run CMake to configure and generate build files, using “MinGW Makefiles” as the generator,
Run mingw32-make -j to build
Building with cygwin
Cygwin is another UNIX like environment on Windows. It has some peculiarities.
HELICS will only build on the 32 bit version due to incompatibilities with ASIO and the 64 bit build. But it does build on the 32 bit versions completely and on the 64 bit version if HELICS_DISABLE_ASIO=ON is set
Also the helics-config utility does not get built due to an incompatibility with the filesystem header.
required packages include CMake, libboost-devel, make, gcc, g++, libzmq(if using zmq)
use the unix makefiles generator